Marketing Management
Marketing
The Marketing menu provides access tools for managing promotions, communications, SEO, and user-generated content.
Promotions
Here you can create catalog and cart price rules that trigger discounts based on a variety of conditions.
- Catalog Price Rule - can be used to offer products to buyers at a discounted price, based on a set of defined conditions.
- Cart Price Rules - Cart price rules apply discounts to items in the shopping cart, based on a set of conditions.
Communications
Customize all notifications sent from your store. Create newsletters and publish RSS feeds.
- Email Template - define the layout, content, and formatting of automated messages sent from your store.
- Newsletter Templates
- Newsletter Queue
- Newsletter Subscribers
SEO&Search
Analyze search terms and synonyms to help customers find products in the store, manage metadata, and create a site map.
- URL Rewrites
- Search Terms
- Search Synonyms
- Site Map
User Content
Create a sense of community, and increase your sales by leveraging user-generated product reviews.
- All Reviews
- Pending Reviews
- Yotpo Reviews
Coupon Code Generator
Generate Coupon
To generate coupon code with the rule created administrator navigates to Marketing > Coupon Code Generator > Generate Coupons section.
The Generate Coupons section is split into two blocks:
- Generate Coupon for Email allows generating a single coupon code for a particular email address. In this block store administrator is suggested specifying the coupon recipient's email, coupon code rule created previously and decides if the notification email should be sent to the customer. Once every option is covered, the administrator clicks on the Generate Coupon button to issue and send the coupons.
- Generate Coupon(s) for Customers allows generating coupon codes for a selected number of customers. The block comes with the filtering and column management options as the Manage Rules section. Once the required list of customers is found and ticked, the store administrator expands the Action box and decides on the coupon rule and further actions. The coupon codes have been generated and can now be tracked under Marketing > Coupon Code Generator > Manage Coupon Codes.
Manage Coupon Code
The Manage Coupon Codes grid offers an insight into the coupon code performance. The block comes with the filtering and column management options as the Manage Rules section.
Here the store administrator can access the customer account, see the rule the coupon has been generated with, and can delete or deactivate required coupon codes.
Manage Rules
The coupon code rules can be created from Marketing > Coupon Code Generator > Manage Rules. The Manage Rules section provides an overview of all the rules available:
- Click on the Columns button to look through available columns and customize the grid, remove/add columns to match your workflow;
- Click on the Filter button to look for the rules matching a custom set of attributes;
- Click on the Default View button to save a number of custom grid views to switch between, depending on the current task.
These active elements of the grid are shared with the Manage Coupon Codes and Generate Coupon(s) for Customers sections that will be covered later in this readme. To create a rule click on the Add New Rule button.
- Rule Information. The first two blocks of the section, General Configuration, and Coupon Usage are intuitive. The third settings block though is new and allows adjusting Code Format. Here the store administrator suggested specifying: coupon length, code format, code prefix and suffix, and if the parts of the code should be separated by the dash.
- Conditions. This section is similar to the native Magento one. Here the store administrator suggested specifying the conditions on which the coupon code can be applied to the shopping cart.
- Actions. Is another inherited section. Here the store administrator decides on the discount type and amount, quantity and quantity step, and how the discount should handle the shipping. In addition, an administrator can add another set of conditions controlling what items the discount should be applied to.
Once done setting up the rule store administrator click on the Save button.
Coupon Code Generator Settings
The extension settings can be found under Stores > Configuration > Aheadworks Ecommerce > Coupon Code Generator.
The General Settings block allows tweaking:
- Email Sender - defines the email from which the coupon code notifications will be sent;
- Email Template - defines the email template which will be sent to the customer (templates can be found and edited at the FTP of the store under view/frontend/email).
Reward Points
Transactions
In addition settings of the Reward Points introduces in Marketing > Reward Points > Transactions.
Here you can control already created transactions and create new ones. To add a new transaction, click on the Add New Transaction button.
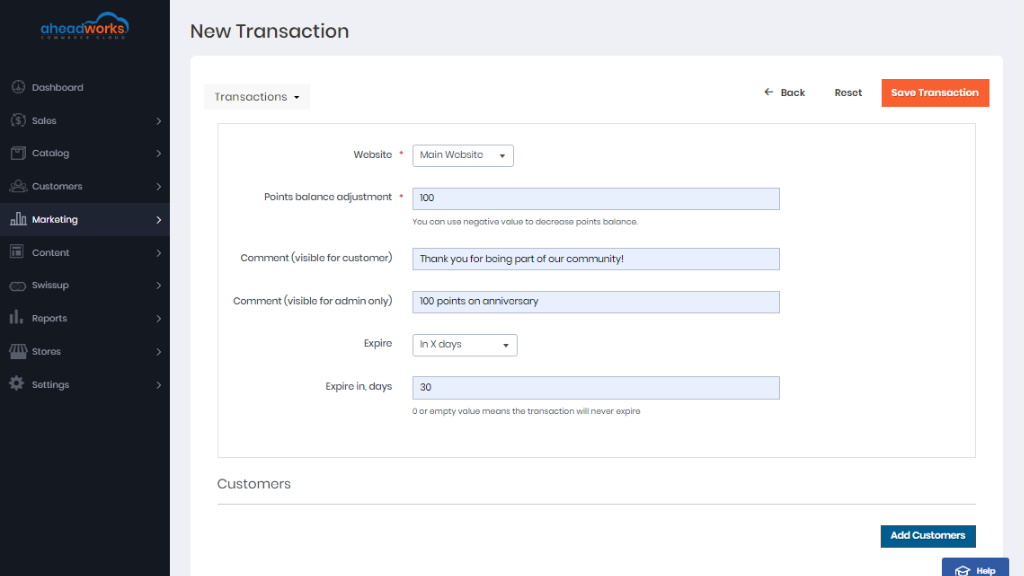
The New Transaction page offers a set of options for updating the points balance of customers:
- Website - allows specifying the website for updating points balances;
- Points balance adjustment - defines the number of points that should be added/subtracted from the points balances;
- Comment (visible for customer) - allows specifying a message for customers to identify the points transaction;
- Comment (visible for admin only) - allows specifying a message for the store administration to identify the points transaction;
- Expire - defines if the points should expire on a particular date or after a set number of days.
The Customers section of the New Transaction page allows specifying store customers that will be eligible to receive a points balance update. The section offers the same navigation options in terms of filters and grid customization as the Transactions section.
- To start adding customers click on the Add Customers button;
- With the help of filters available find customer(s) that you want to update points balance for;
- Once done, click on the Add Selected Customers button.
Customers
The Customers section of the Reward Points module offers an overview of the customers and their current points balance. The section has the same navigation options as the Transactions section and proves useful for keeping track of the use of the point of a particular customer(s).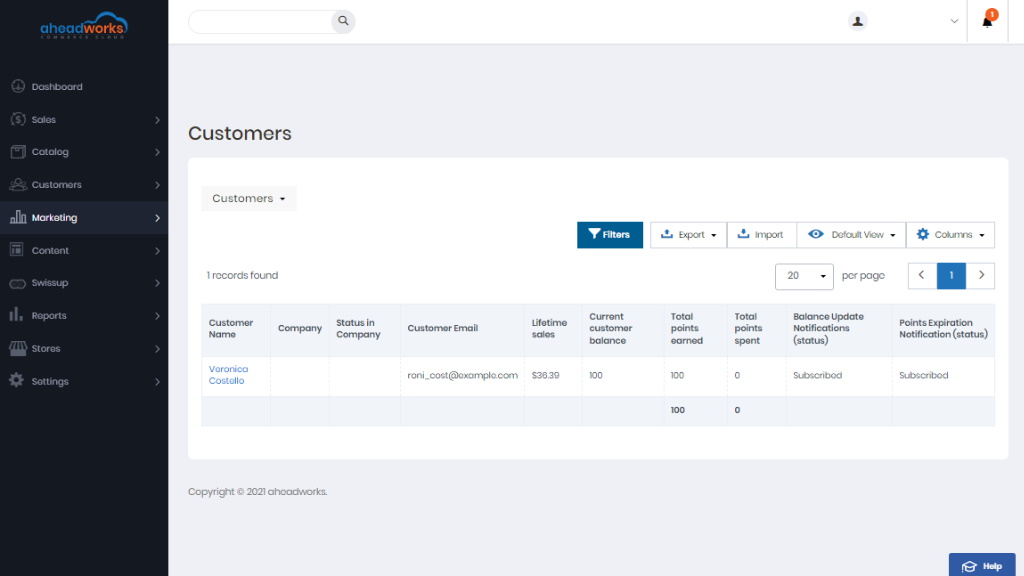
“Reward points” tab at Customer Page
Reward points information is available on the Customer Page at the Reward Points tab. It offers an overview of all customers’ points balance and allows the Admin to adjust the balance.
The Balance Summary grid shows customers’ statistics on the current points balance, total points earned, and total points spent.
The Transaction History grid introduces the same information as the Transactions section.
The Balance Adjustment section offers a set of options for updating the points balance of customers as in the New Transaction page.
Points Earning Rules
To configure the earning rules follow Marketing > Reward Points > Point Earning Rules. Here you can see the grid with all the existing earning rules. The Enable/Disable/Delete actions are available for the rules.
How do I can add a new rule?
- To add a new rule click the corresponding button.
- Enable the rule.
- Give it a name and description.
- Specify the website and customer groups to which you apply the rules.
- Define the dates when the rule promo will be active.
- Assign the rule priority to avoid possible rule conflicts. (If a product matches several rules, they will be applied according to their Priority option. To prevent this, enable the option "Discard Subsequent Rules".)
- The Promo Settings allow replacing the promo text for particular product pages. Promo text does not take in account tier prices: The "%X" variable always displays the number of points which will be earned for a purchase of 1 item. Thus, it is recommended to use a text construction like "buy and earn up to %X points per item". Apart from this, the number of points which will be earned for purchase is calculated and displayed on the cart page correctly. The module perceives each item in a configurable product but the displayed point amount is based on a product with the highest price. It is recommended to use the phrase "get up to %X points" in the earning rule settings.
-
Conditions for rule applying are chosen based on product attributes or conditions combination.Choose the rule action between:
- Multiply a defined earn rate.
- Add a fixed amount of points in addition to earning rate.
Reward Points Settings
To configure the module, proceed to Stores > Configuration > Aheadworks Ecommerce > Reward Points. The page comes in four sections: Calculation, Points Awarded For, Storefront, and Email Notifications.
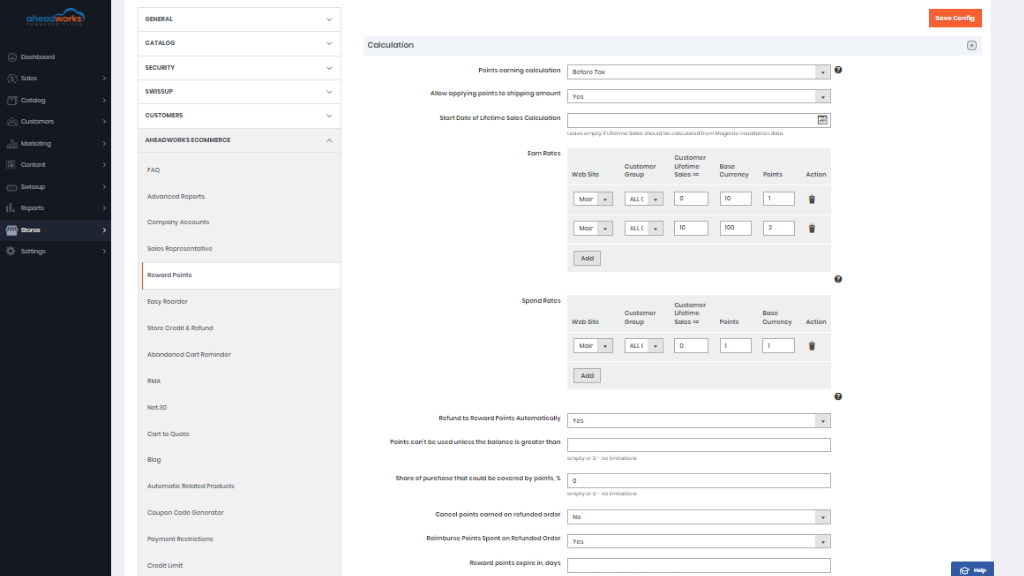
The Calculation section enables configuring earning and spending rates of points, points compliance with taxes, shipping, lifetime sales, refunds, and points spending nuances. This functionality is realized within the following fields:
- Points earning calculation - the After Tax/Before Tax selector to define if the points calculation formula is to include or exclude the value of tax;
- Allow applying points to shipping amount - the Yes/No selector to define if the points calculation formula is to include or exclude the value of shipping;
- Start Date of Lifetime Sales Calculation - the date to indicate the start of count of lifetime sales for each customer registered at the store;
- Earn Rates - the block to set the ratio of earned points to an amount in base currency;
- Spend Rates - the block to set the ratio of spent points to an amount in base currency;
- Refund to Reward Points Automatically - the Yes/No selector to define if refunds are to be done into points. When set to Yes the '
- Points can't be used unless the balance is greater than - the whole numeric to indicate the lowest minimum amount of points available to the Customer, which allows him/her to use points towards purchase;
- Share of purchase that could be covered by points, % - the % of an order total that can be covered with points (Helps avoiding zero checkouts);
- Cancel points earned on refunded order - the Yes/No selector to define if points are to be deducted from the points balance of the Customer when his/her order is refunded;
- Reimburse Points Spent on Refunded Order - the Yes/No selector to define if points which the Customer had spent on an order are to be automatically added to the balance when the order is refunded
- Reward points expire in, days - the whole numeric to define the time (in days), during which earned points are available to the Customer (Urges customers to place more orders).
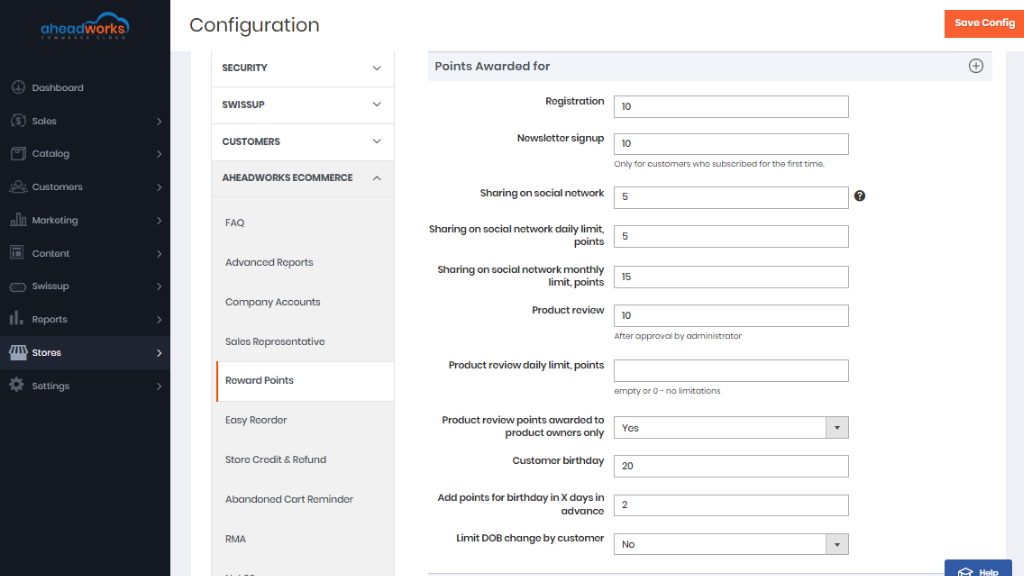
The Points Awarded For section defines the occasions when points are to be added to the Customer's balance:
- Registration- the number of points to be awarded to the Customer on registering at the store (This may prove useful if you want to avoid guest checkouts and get more information on your customers);
- Newsletter signup - the number of points to be awarded to the Customer on subscribing to Newsletter (or when subscribed to by the Admin);
- Sharing on social network - the number of points to be awarded to the Customer on sharing a store page to a social network;
- Sharing on social network daily limit, points - the maximum number of points that can be awarded to the Customer on sharing store pages to social networks per day;
- Sharing on social network monthly limit, points - the maximum number of points that can be awarded to the Customer on sharing store pages to social networks per month;
- Product review - the number of points to be awarded to the Customer on leaving a review to a product (Points are awarded only after the review is approved);
- Product review daily limit, points - the maximum number of points that can be awarded to the Customer on leaving a review to a product per day;
- Product review points awarded to product owners only - the Yes/No selector to allow limiting point awards only to the customers who have purchased the product;
- Customer birthday - the number of points to be awarded to the Customer on his/her birthday;
- Add points for birthday in X days in advance - the number of days for the birthday points to be awarded to the Customer in advance of his/her birthday;
- Limit DOB change by customer - the No/Once A Year selector to enable the limit on Customer's changing his/her date of birth.
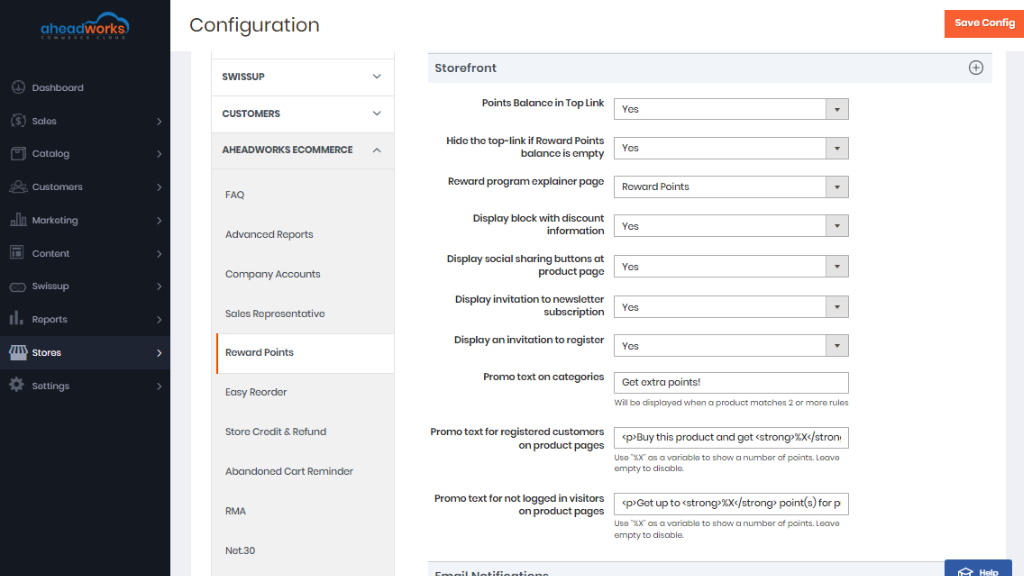
The Storefront section guides customers on the Frontend on earning and spending points. The sections show the following parameters for configuration:
- Points Balance in Top Link - the Yes/No selector to define if the points available to the Customer are to be displayed below the product title at the product page
- Hide the top-link if Reward points balance is empty - the Yes/No selector to define if the points balance is to be displayed in the top link if the Customer has an empty points balance
- Reward program explainer page - the page selector to define the CMS page, a user guide to points collection and usage
- Display block with discount information -
- Display social sharing buttons at product page - the Yes/No selector to define if the social sharing buttons should be displayed at the product pages
- Display invitation to newsletter subscription - the Yes/No selector to display an invitation to Newsletter subscription
- Display an invitation to register - the Yes/No selector to display an invitation to start an account within the store
- Promo text on categories - the text of the promo message to motivate customers to buy more
- Promo text for registered customers on product pages - the HTML-friendly text of the promo message to motivate registered customers to buy more
- Promo text for not logged in visitors on product pages - the HTML-friendly text of the promo message to motivate guest customers to buy more
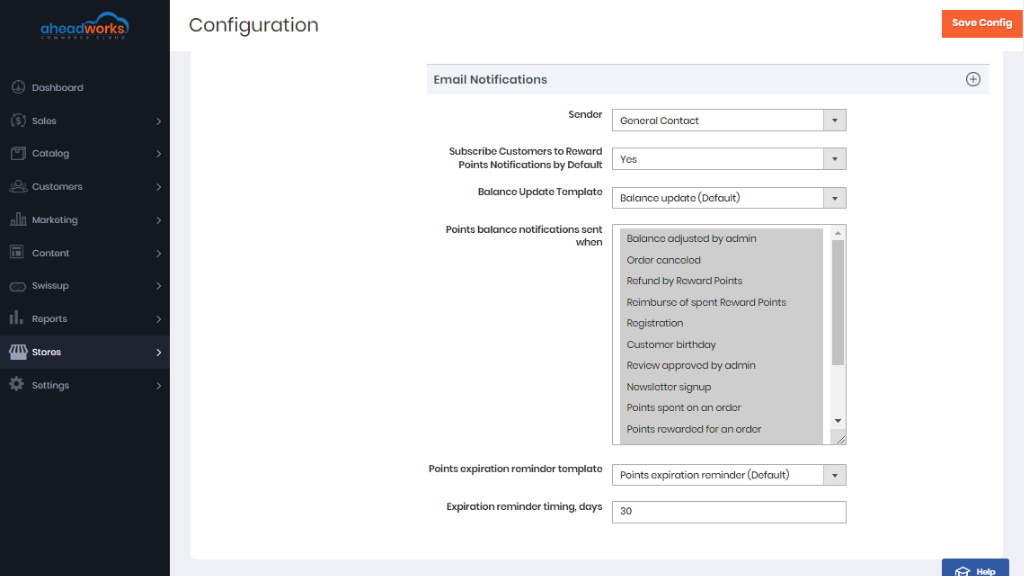
The Email Notifications section controls email notifications to be sent to customers on updates to their points balances. The sections considers the following parameters for configuration:
- Sender - the selector to define the role and the email address, linked to it, from which notification emails are to be sent
- Subscribe Customers to Reward Points Notifications by Default - the Yes/No selector to define if the Customer is to be subscribed to the notifications by default or is to do that him/herself from My Account
- Balance Update Template - the selector of the email template to notify customers on updates to their points balances
- Points balance notifications sent when - the selector of occasions for notifications to be sent to customers (multiple selection is possible)
- Points expiration reminder template - the selector of the email template regarding points expiration
- Expiration reminder timing, days - the whole number to indicate the period in days when the notification on points expiration is to be sent in advance
Store Credit and Refund
Transactions
Store Credit and Refund extension support manual transactions allowing the storeowner updating customer's credit balance whenever required. To manually update credit balance the storeowner navigates to Marketing > Store Credit & Refund by Aheadworks > Transactions.
Transactions grid comes with the following interactive elements:
- The "Columns" button allows customizing the grid look by hiding, applying columns. Some columns may be excessive and some relevant to the current tasks;
- The "Filters" button allows looking for particular transactions depending on the filters selected;
- The "Default View" button allows saving the perfect grid look to quickly load it whenever required.
To add new transaction the storeowner clicks on the Add New Transaction button.
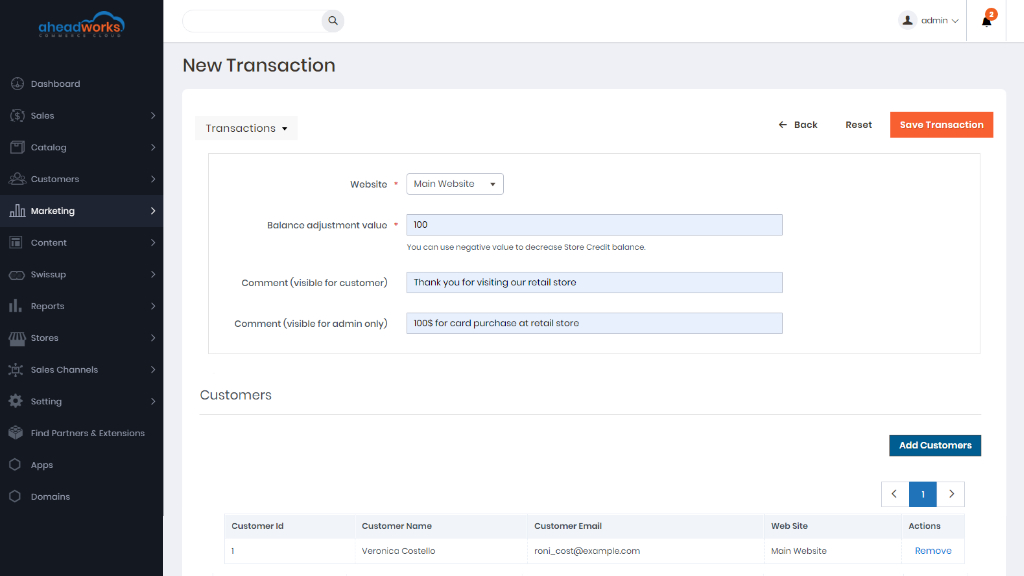
At the New Transaction page the Admin specifies:
- Website - the store view the transaction should be made for;
- Balance adjustment value - how much store credit should be added/subtracted from customer(s) account(s);
- Comment (visible for a customer) - a short message on the transaction for the customer;
- Comment (visible for admin only) - a short message for the store administrator.
When done with the transaction options the Admin is suggested to select customer(s) by clicking on the Add Customers button. Once the customer(s) is selected the Admin clicks on the Save Transaction button.
Customers
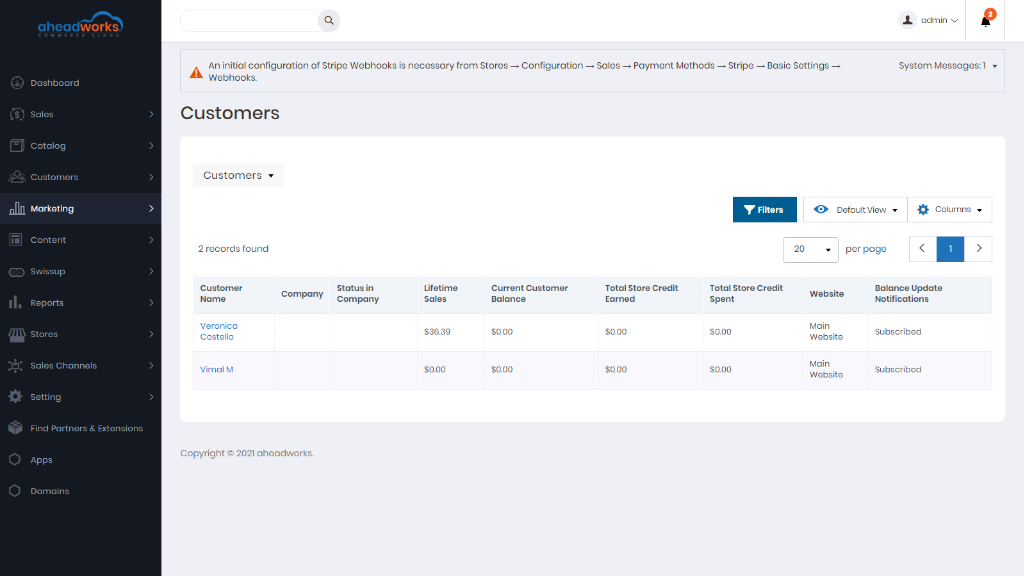
For the performance tracking and understanding how many customers have an active store credit balance, the module introduces the Customers grid that can be accessed via Marketing → Store Credit & Refund → Customers.
The grid comes with the same interactive elements as the Transactions grid. Here the storeowner can get an overview of the store credit earn-spent history and see if the customer(s) is subscribed to the balance updates.
Issuing Refunds
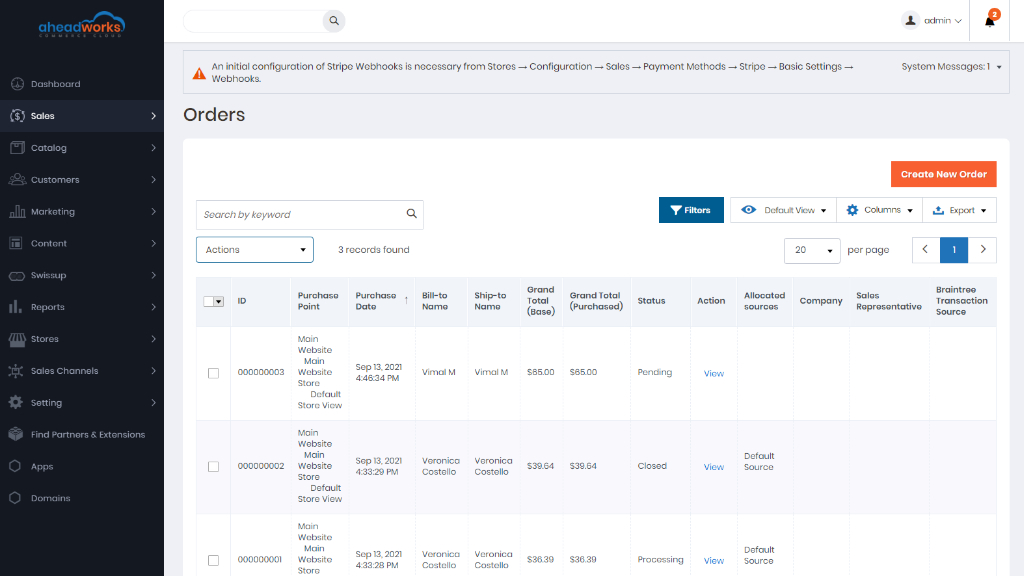
To issue a refund to store credit Storeowner navigates to the required order at Sales > Orders and proceeds to the Credit Memo of the order.
At the bottom of the page the Storeowner can see a Refund to Store Credit checkbox with a field allowing for manual store credit input:
- By default the Grand Total value of the order is specified in the field;
- If required the Storeowner can specify any value from 0 to Order Grand Total to partially refund the order to store credit;
- Refund to Store Credit field value cannot exceed Order Grand Total value.
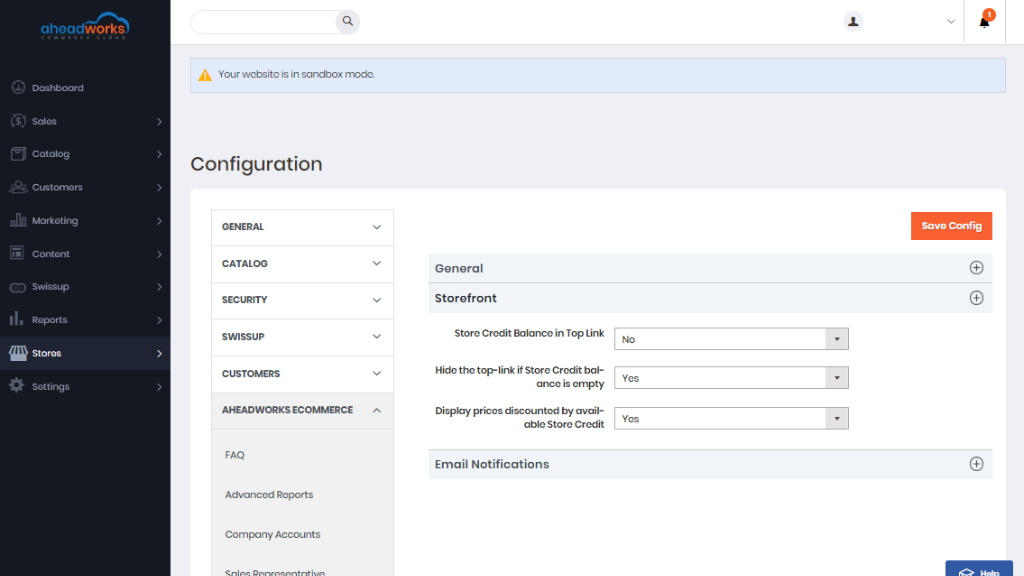
Store Credit and Refund Settings
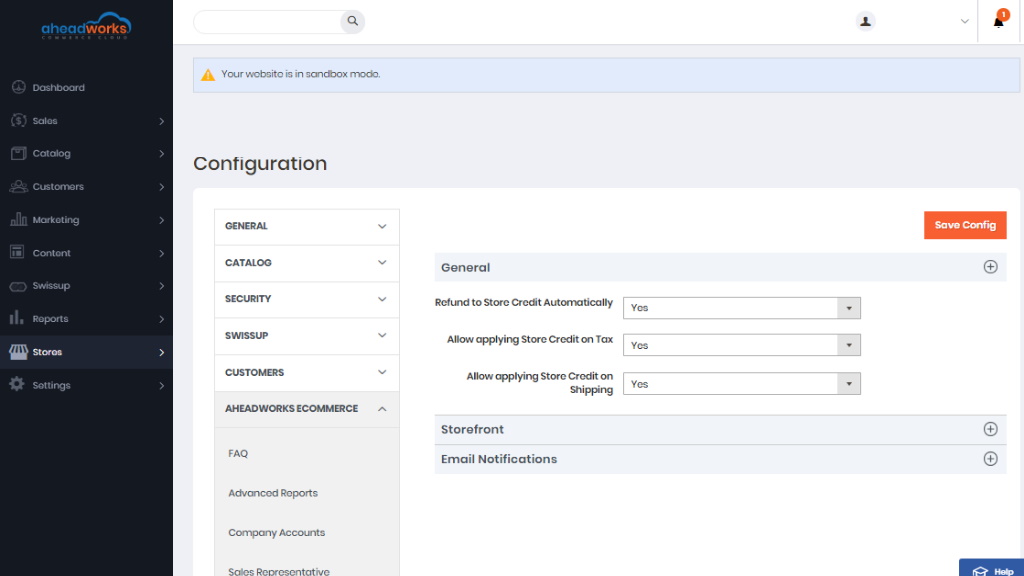
Proceeds to the module settings page that can be found at Stores > Configuration > Aheadworks Ecommerce > Store Credit and Refund.
General settings control default extension's behavior and define how the store credit should be applied to orders:
- Refund to Store Credit Automatically - if enabled the checkbox 'Refund to Store Credit' at the credit memo page is ticked by default allowing one-click refunds;
- Allow applying Store Credit on Tax - if enabled customers can pay order taxes with store credit;
- Allow applying Store Credit on Shipping - if enabled customers can pay for shipping with store credit;
The Storefront section controls the module's behavior on the Frontend and where the extension blocks are displayed:
- Store Credit Balance in Top Link - defines if the available store credit balance of the customer is displayed in the page header;
- Hide the top-link if Store Credit balance is empty - defines if 'Store Credit Balance in Top Link' is displayed if the customer does not have store credit available;
- Display prices discounted by available Store Credit - defines if the notification on how many customers can save by paying with a credit balance is displayed below the product price.
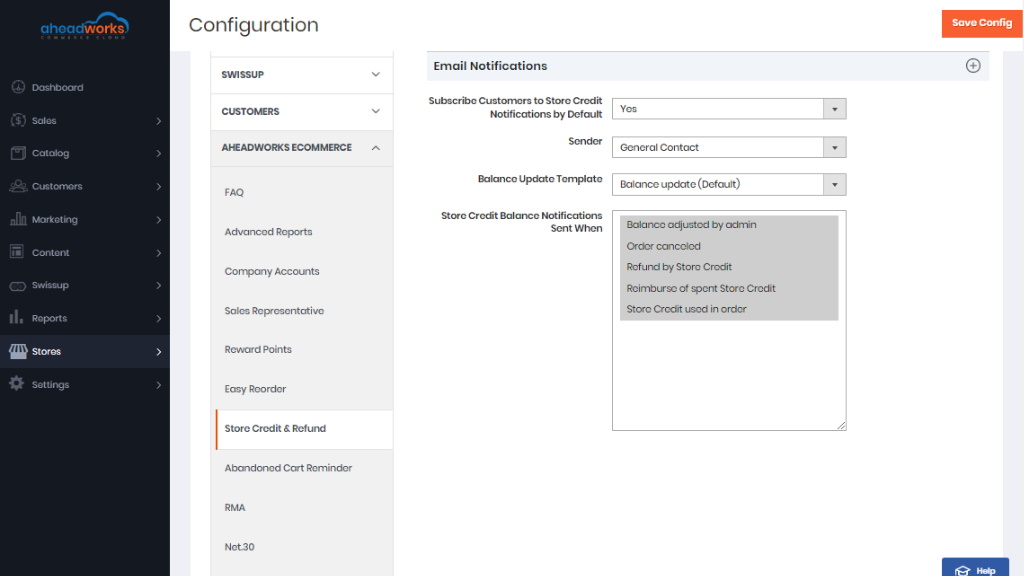
The Email Notifications controls how the credit balance updates are delivered to customers:
- Subscribe Customers to Store Credit Notifications by Default - is enabled all customers will receive email notifications on credit balance updates;
- Sender - defines the email address from which all email notifications are sent;
- Balance Update - defines the email template of the balance notifications;
- Store Credit Balance Notifications Sent When - defines on what conditions the balance updates are sent:
- Balance adjusted by admin;
- Order canceled;
- Refund by Store Credit;
- Reimburse of spent Store Credit;
- Store Credit used in order.
|
Store Credit spent on the canceled order is refunded automatically to the Customer's balance. |
Automatic Related Products
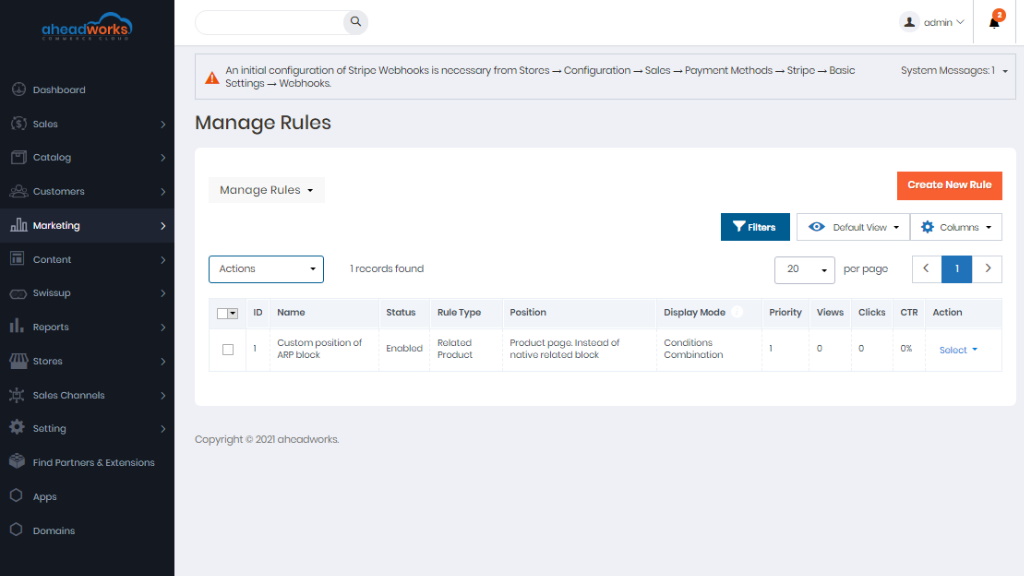
Manage Rules
The new Automatic Related Product rule can be created from the Manage Rules section.
If you already have one or several rules created, this section provides the following opportunities:
- The Create New Rule button navigates you to the New Rule screen where you are suggested to create new related product rules;
- Clicking a rule name navigates you to the Edit Rule page where you can adjust the created rule settings;
- Enable and Disable quickly enable/disable the created rules;
- Delete allow to delete the created rule.
Manage Rules Grid
This is the section where all the Automatic Related Products rule management takes place.
Here you are provided with rule short descriptions and performance stats:
- Views - displays the number of customer visits to the pages with the ARP block;
- Clicks - displays the number of clicks on the products displayed in the ARP block (both products clicks and add to cart actions are counted);
- CTR (Click-through rate) - represents the View-to-Click ratio.
To create a new rule, follow the steps below:
Step 1
Click on the Create New Rule button. You are now being navigated to the New Rule page.
Step 2
In the Rule Information section, decide on the following:
- Enable/disable the rule;
- Choose the ARP block's position in the Block Position field. Currently, there are eleven product page block positions, five shopping cart page positions, two catalog page positions, and the custom position option;
- Decide on the ARP rule name and type it in the Name field (the name is used for internal identification purposes);
- Set the ARP block's Priority;
- Select the Store View the ARP block is to be displayed on;
- Select Customer Groups the ARP block is to be displayed to;
- Select Customer Segments the ARP block is to be displayed to.

Step 3
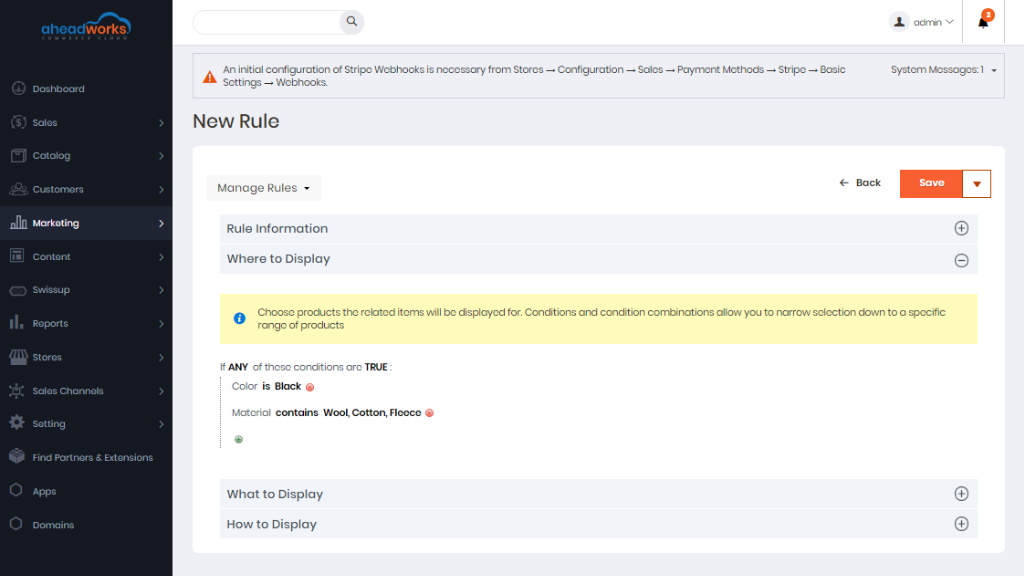
In the Where to Display section, you are suggested to specify the product attributes or attribute combinations defining on which pages the ARP block should be displayed.
Depending on your requirements, you can either:
1) Define a particular set of product pages that will display the ARP block;
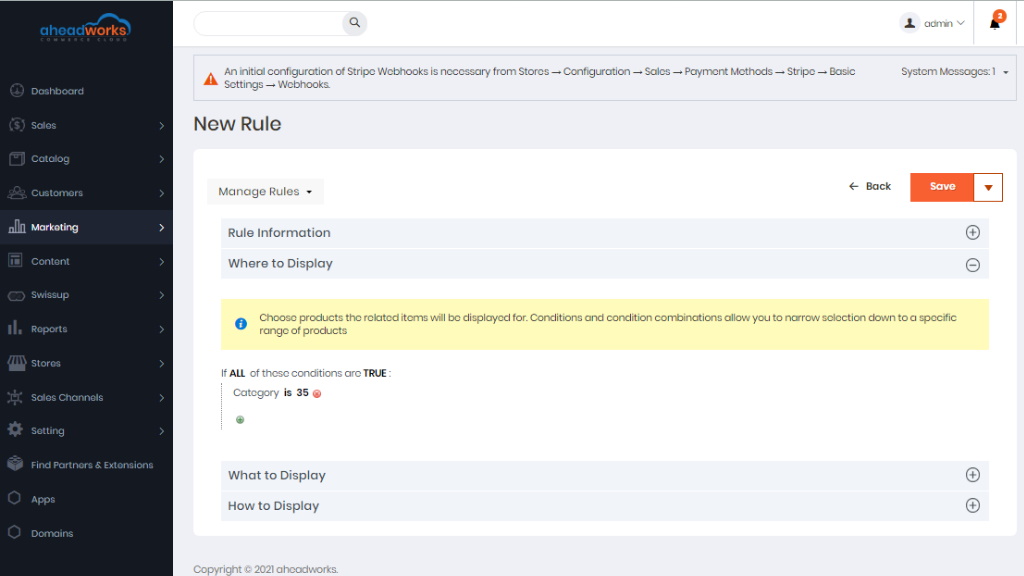
2) Display the ARP block on all product pages excluding a particular set of product pages.
Step 4
In the 'What to Display' section you are suggested to choose among the three display options:
- Conditions Combination;
- Who Bought This Also Bought (WBTAB);
- Who Viewed This Also Viewed (WVTAV).
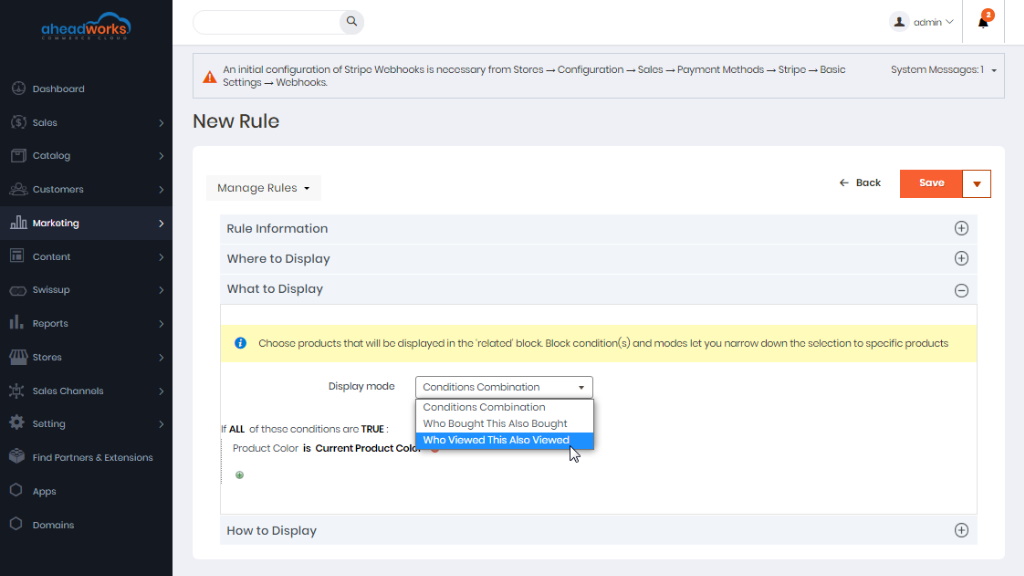
The Conditions Combination option specifies the product attributes or attribute combinations defining the products to be displayed in the ARP block.
With the Who Bought This Also Bought display option, you can select the related products that are frequently bought together with the current product.
If enabled in the extension settings, the Who Viewed This Also Viewed option selects the products that are frequently viewed together with the current product (consider the above note) within a single browser session.
With the enabled Suggest Products from One Category Only toggle switch button, the extension considers only the items that belong to the category of the current product.
The Suggest Products Only with Price Higher than Price of Current Product option, accordingly, selects only the items with higher prices.
And the combination of these two filters even further narrows down the list of available related products. Suitable for big stores handling numerous visits and sessions.
This display option can be further configured in order to filter particular products from the above selection.
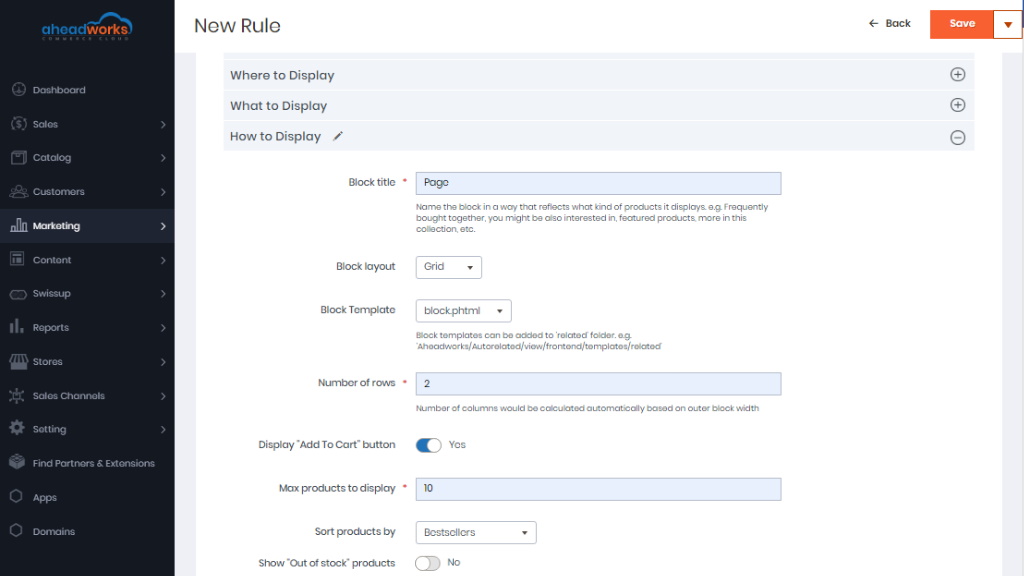
Step 5
In the How to Display section you are suggested to adjust the ARP block look's and feel:
- Set the name of the ARP block that will be displayed to the store customers in the Block title field;
- Decide on how the ARP block will look like in the Block layout field: grid or slider;
- If you select the grid block layout option, it will be suggested to specify the number of rows in the block grid;
- Specify if you want to Add to cart display under every product in the ARP block with the Display "Add To Cart" button selector;
- Set the maximum number of products displayed in the ARP block in the Max products to display field;
- Decide on how you want the related products to be sorted in the ARP block, for example, by bestsellers, low to high prices, the newest, etc.
General Settings
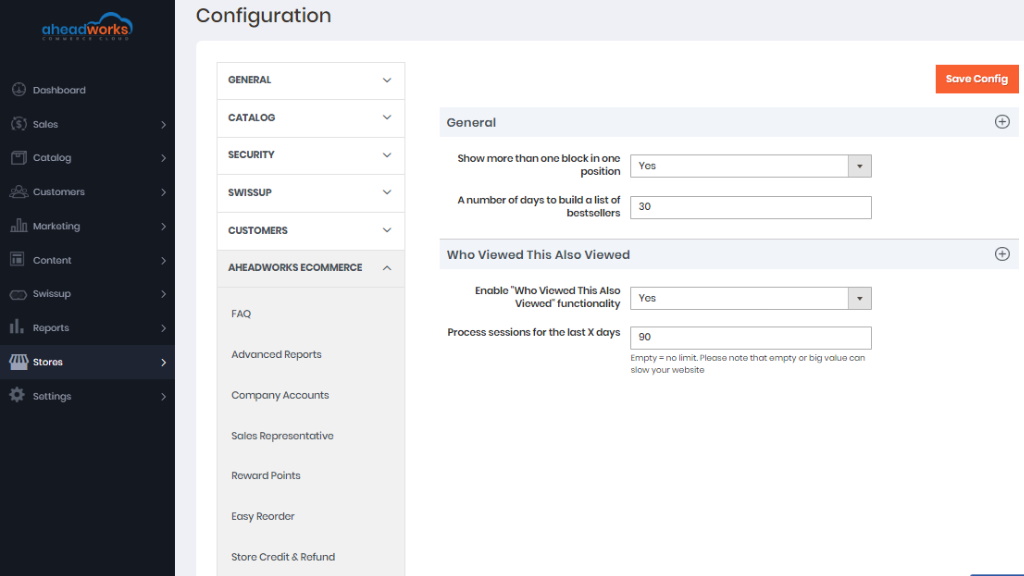
The General Settings section is available under Stores > Configuration > Aheadworks Ecommerce > Automatic Related Products.
In the General field, you can configure the following fields and options:
- Show more than one block in one position - prioritize multiple related product blocks taking the same position (for example, between the blocks with Priority 1 and Priority 5 the extension will display the first one);
- A number of days to build a list of bestsellers - define the number of days during which the module will process the data on the best-selling products.
Who Viewed This Also Viewed. The setting block enables the Who Viewed This Also Viewed display mode and determines the period of processed sessions (e.g. ‘Empty’ means no limitations, which might slow down your website).
|
If the WVTAV functionality is enabled, the module starts an additional cron job once in 24h updating the related product blocks working under the WVTAV display mode. |
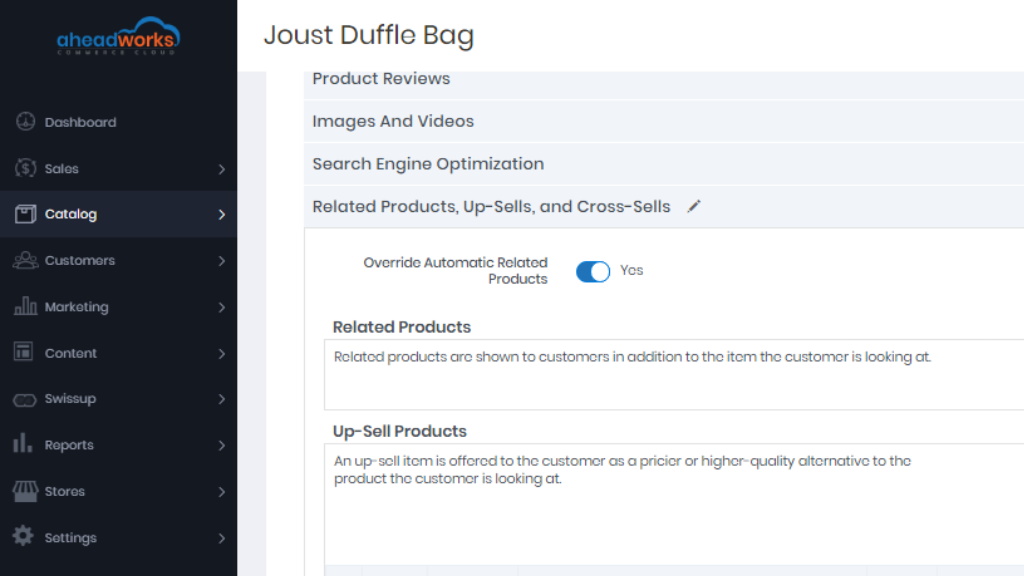
Overriding Automatic Related Products
The ARP block can be overridden with related products on the product level. To do this, navigate to Catalog > Products, select the product you want to override and expand the Related Products, Up-Sells, and Cross-Sells section.